
Help Centre
<
HomeIntroduction
Using Salesfire to enrich your Klaviyo data can increase the value of your Abandon Basket and Browse events by over 100% - and it’s a simple integration to setup.
We have designed our data to seamlessly fit inside your existing Klaviyo templates, meaning there is little to no changes needed to be made to your current infrastructure.
Syncing events
In order to sync your Salesfire events, we will need to set up an API within Klaviyo. The steps for this are:
- Navigate to Klaviyo > Klaviyo Settings > API Keys
- Create Private API Key
- Name your key appropriately (such as Salesfire Event Tracking)
- Click on ‘Full Access Key’
- Click on Create
- Download your key and keep it somewhere safe
- Copy your key
- Open your Salesfire Dashboard
- Open Settings > Integrations > Klaviyo
- Input your API key and hit ‘save’
You’re now syncing Salesfire events to Klaviyo!
Building your journeys
In order to start sending using your Salesfire events, you will need to follow the below steps:
Browse Abandon
- Duplicate your existing Abandon Browse Journey. Click the three dots on the right side and press ‘clone’
- Add (Salesfire) to the front of the name for your new journey
- Choose your new trigger - ‘Product Viewed - Salesfire’
- Increase your time delay after the first event (for example, if your existing flow has a four hour delay, add a four hour and five minute delay). This gives your Klaviyo journey time to fire first.
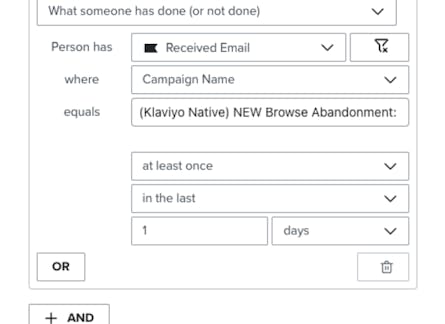
- Add a ‘Conditional Split’ after your time delay. Within this, you need to set up the below filter. This filters out any customers who have received your native Klaviyo email. Make sure you include the campaign name for your existing Abandon Browse email.
Make sure to click on the ‘filter’ icon, which will allow you to select ‘campaign name’. Choose your time delay to be the same time as the journey itself - if the journey will take users three days, set this rule for three days. To find this, look at the time delays in the existing journey and add them together.
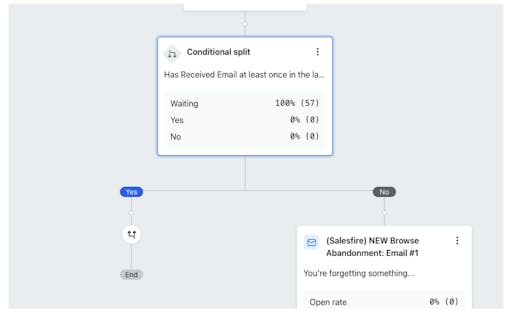
- With this filter, ensure your YES split leads to an empty node, that will mean users who qualify leave the flow. On your NO split, leave your existing campaign. This will look like below.
- Open up your email campaign, and click ‘Edit’ next to your template.
- Rename your template, with (Salesfire) on the front.
- Click on ‘Preview and Test’. This will then dynamically populate your template using Salesfire data.
- Ensure the content populates correctly. If it does, you’re good to go. If not, read on.
Basket Abandon
- Duplicate your existing Abandon Basket Journey
- Choose your new trigger - ‘Added To Cart - Salesfire’
- Add (Salesfire) to the front of the name for your new journey
- Increase your time delay (for example, if your existing flow has a four hour delay, add a four hour and five minute delay). This gives your Klaviyo journey time to fire first.
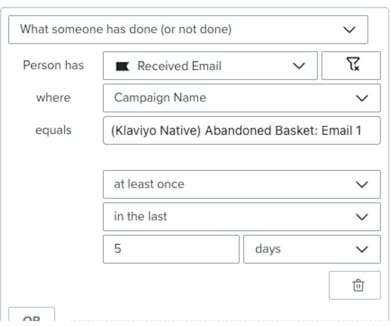
- Add a ‘Conditional Split’ after your time delay. Within this, you need to set up the below filter. This filters out any customers who have received your native Klaviyo email. Make sure you include the campaign name for your existing Abandon Browse email.
Make sure to click on the ‘filter’ icon, which will allow you to select ‘campaign name’. Choose your time delay to be the same time as the journey itself - if the journey will take users three days, set this rule for three days. To find this, look at the time delays in the existing journey and add them together.
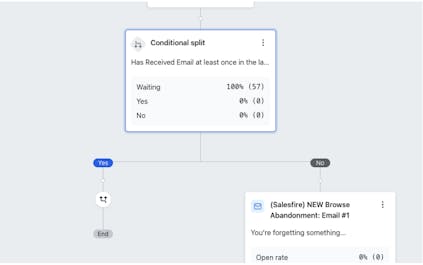
- With this filter, ensure your YES split leads to an empty node, that will mean users who qualify leave the flow. On your NO split, leave your existing campaign. This will look like below.
- Open up your email campaign, and click ‘Edit’ next to your template
- Rename your template, with (Salesfire) on the front.
- Click on ‘Preview and Test’. This will then dynamically populate your template using Salesfire data.
- Ensure the content populates correctly. If it does, you’re good to go. If not, read on.
Adjusting your Template Structure
There’s a small chance that our data might not fit within your handlebar setup. This can be dictated by the web platform you use. If that is the case, you will need to tweak the naming conventions:
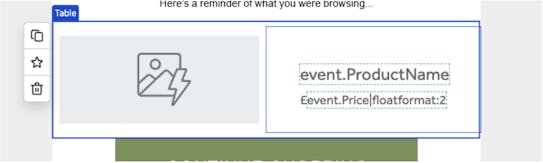
- {{event.ProductName}} for your product name
- £{{event.Price|floatformat:2}} for your product price