Help Centre
<
HomeImporting contacts for Lists allows users to import names, mobile numbers and email addresses into the Salesfire dashboard and to manually manage this data in a specific list.
These are manual imports of data that can be curated into separated lists so that your chosen imported list can be targeted with dedicated Email and SMS campaigns of your choosing.
How to import contacts into Lists
Within your Salesfire dashboard select Audiences from the main menu.
Go to Segments & Lists.
Select Create New and then from the pop out modal select List, don't forget to name your list next to the edit icon to ensure your list import has a reference name for future use.

Upon selecting List, select Create Audience. You will then be directed to the Import Lists pop out modal.
Upon selecting, this modal will appear:

You will need to upload the data in the following format:

Please keep any names in one column for uploading - first name and last name myst be in one column.
The file upload will accept country codes, for example +447123456789 or 44123456789 we will also accept '0' 07123456789.
Accepted date of birth formats for importing:
- 15-03-1988
- 15/03/1988
- 15031988
- 15-3-88
- 15/3/88
Importing location data
Location data can be imported into a List to segment data by distance from City, Country or Postcode. The Location segment criteria can only be gathered from a data import.
Postcode data imported into a List will allow for accurate location segmenting as the longitude and latitude of a postcode will be used to identify the distance from a town, city or country.
Managing your import
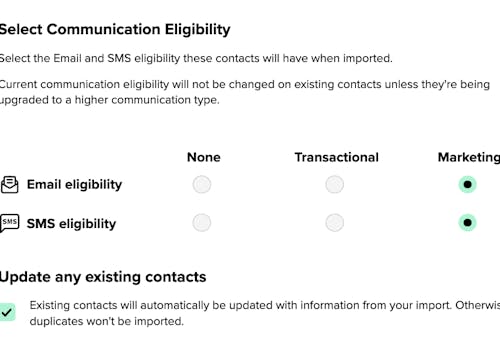
Within the modal you may select the eligibility preferences for your data upload, are they marketing or transactional?
Choose one option for your SMS uploads and your Email uploads.
Selecting 'None' will not upload your data with any marketing preferences and therefore will not be used for any email campaign sends.
Preferences must be selected using the modal Communication Eligibility section, preferences cannot be taken from a CSV upload. Please ensure you select marketing or transactional for your file upload.
Transactional eligibility emails can only be sent when a confirmed transaction such as an order confirmation or abandoned cart have taken place. A transactional import cannot be used to send promotional email campaigns to.
Marketing eligibility allows emails to promote products, services, or events to customers.
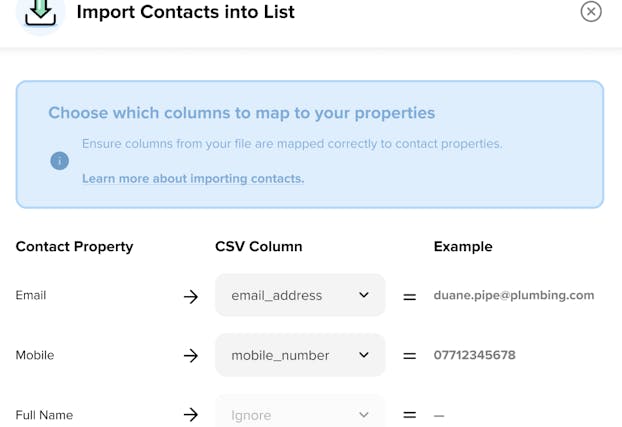
Once completed, select Start Import, you will then be directed to Choose which columns to map to your properties.
Mapping data properties
Mapping properties when importing contacts will allow you to choose the columns from your CSV upload, column titles are not required.
Selecting the columns you would like to map will ensure they are mapped to the correct properties. A preview will appear on the dropdown for each of the contact properties where you may select the CSV column you would like to pull through from the import.

An example will appear alongside the column selected allowing you to preview the data from the CSV column selected.
Once you are happy with your selection from the import, select Import Contacts to complete the import to List.
This data will be added to the Segments & Lists section of the dashboard as a List. View analytics for your lists within this section and also select the More dropdown to view your contacts and import further contacts.
You may check the success in the dashboard settings under Imports & Exports. In the dashboard menu select Settings and then select Imports & Exports.
Imported data time can vary depending on the size of the file uploaded.
Adding additional Contacts to List
If you require additional data to be added to an already imported list.
Within the Segments & Lists tab, go to the list you wish to import additional data to and More and from the dropdown menu select Import Contacts.

This is only applicable on manually created Lists and not automated Segment data.