Help Centre
<
HomeUse the API instructions to instantly sync your customers from other platforms to Salesfire.
Syncing data to Salesfire
From the Salesfire dashboard menu, head to the Settings option and select API from the menu.
Monitoring
The monitoring tab will allow you to view the activity and log of any data requests that are being sent to Salesfire via an API. This will include trends such as successful data passes and any errors that could potentially occur.
Endpoints
The Endpoints tab will provide a log of all the endpoints that have been created. The View option will detail instructions on how the data must be passed to Salesfire.
Choose a Customer List:
- From the dropdown, select the list you want to sync.
- Once selected, you’ll see a special API link for that list (it will look something like: https://api.salesfire.co.uk/client/{site}/customers/{list}).
Add Customer Data:
- You’ll be sending customer info like email, phone number and marketing preferences. Email or phone number (must have at least one)
- Type of messages: MARKETING or TRANSACTIONAL. How they want to be contacted: EMAIL or SMS Option to update existing profiles (yes/no)
Security Step
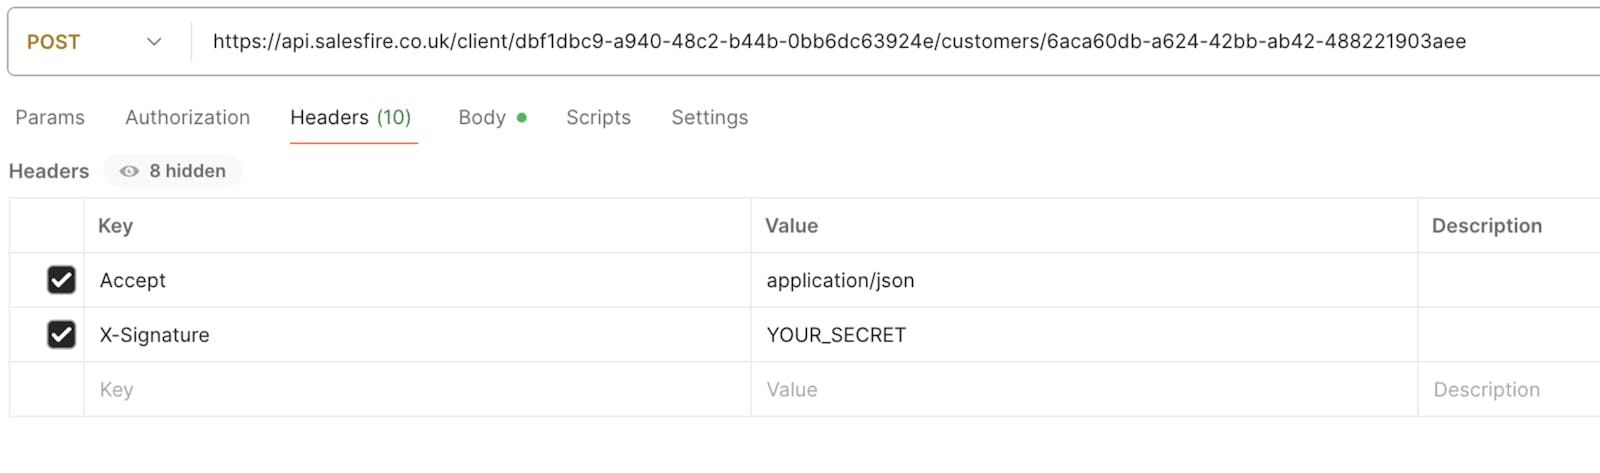
- Salesfire needs to make sure the data is coming from your chosen site. This is done automatically using a special code (called X-Signature) when the data is sent.
Validation Rules:
- Every customer must have either an email or phone number.
- Types and channels must be all uppercase (MARKETING, TRANSACTIONAL, EMAIL, SMS).
- If you choose to update existing profiles, the system will skip duplicates.
The default custom attributes are:
- name
- date_of_birth
- postcode
- city
- country
Here is the example payload
{
    "email": "john.doe@example.com",
    "types": [
        "MARKETING",
        "TRANSACTIONAL"
    ],
    "channels": [
        "EMAIL",
        "SMS"
    ],
    "update_existing": true,
    "attributes": {
        "name": "John Doe",
        "date_of_birth": "04/09/1994"
    }
}
For date_of_birth the accepted formats are:
04-09-1994
04/09/1994
04091994
4-9-94
4/9/94
1994-09-04
1994/09/04
The following information may be useful for your developer to assist with syncing Email and SMS data from your chosen platform and connecting this to Salesfire.
Setting up a List for your data sync
Within the Audiences tab of your Salesfire dashboard you will find the Segments & Lists tab.
Follow the API Instructions button to begin the steps in the flight out modal to sync your customers into the Salesfire platform.
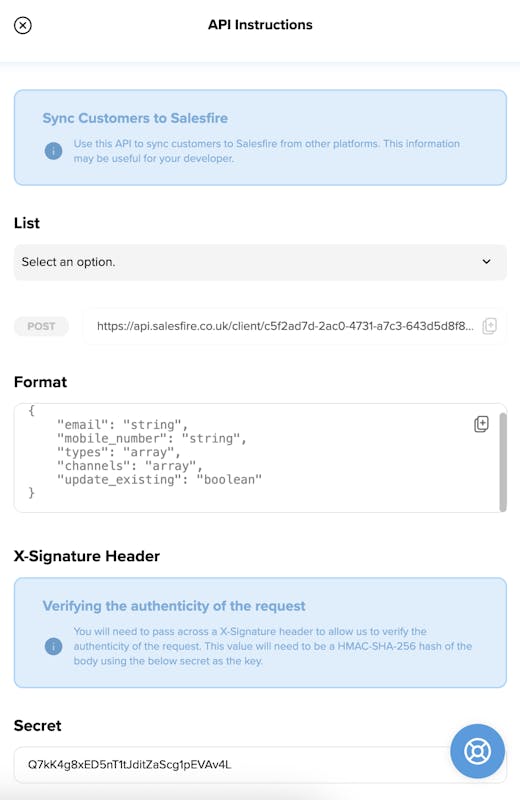
A list must be selected from the List dropdown. Once selected the list API URL will appear: example
https://api.salesfire.co.uk/client/{site}/customers/{list}
It is important that an X-Signature is added to the header, this allow Salesfire to verify the authenticity of the request.
This value will need to be a HMAC-SHA-256 hash of the body using the secret as the key. The Secret can be found below the X-Signature section in the flight out modal.
Please note, there is a validation error messages to prompt if the data structure is invalid. Validation rules can be found in the above section.
If you are having issues syncing customers API and do not see an error message you may need to set the header Accept: application/json in the request. Otherwise, you may be redirected instead of seeing the validation error message.