Help Centre
<
HomeLearn the steps to building an automated campaign flow using the Salesfire campaign builder. This includes how to trigger a campaign, add SMS, split tests and use conditions to personalise the user journey.
You can use automated campaigns in the Email & SMS section of your Salesfire dashboard to send sequence campaigns based on proven strategies, such as cart abandonment, search and browse abandonment, saving a basket, post-purchase follow-up emails and SMS, and email sign-up confirmations.
Overview of the Builder
The campaign builder is a workflow tool that lets you design automated customer journeys. Each flow is made up of:
- Trigger: Defines when someone enters the campaign at the start of the journey.
- Actions: Choose from Emails, SMS messages, or delays using the plus option.
- Conditions/Splits: Logic that controls different paths
- End points: Where a journey finishes
The left-hand panel contains your Settings, where you control the campaign's timing and overall conditions.

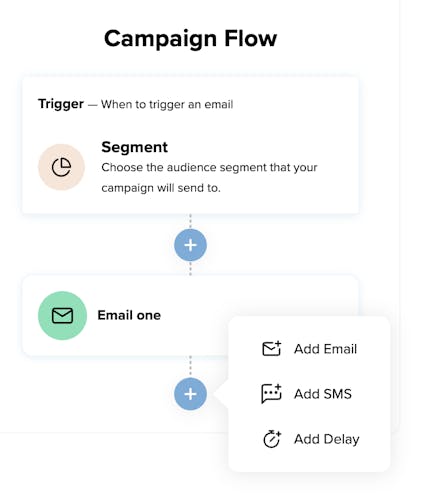
Step 1: Set Your Campaign Trigger
At the top of the flow, you’ll see the Audience block. This determines when a customer enters the campaign.
- Click the trigger block and select Edit.
- Choose your audience rule (e.g. when a user joins a list or segment) Segments can be managed in the Audiences section of your Salesfire dashboard.
- Save your selection
This is the starting point for every user entering the flow.
Step 2: Add Your First Message
To add an email or SMS:
- Click the “+” icon beneath the trigger
- Select one of the following:
- Add Email
- Add SMS
- Add Delay this creates delay time approaches for your campaigns to send at different times.
- Configure your message:
- For email: subject line, content, sender details
- For SMS: message text and sender name
This creates your first touchpoint in the journey.
Step 3: Introduce Conditions
Conditions allow you to personalise the flow based on user behaviour or attributes.
- Click the “+” icon where you want to branch the journey
- Select Add Conditional Split
- Define your condition (e.g. “Interested in Brand X”, ‘‘has opened/clicked email X amount of times’’)
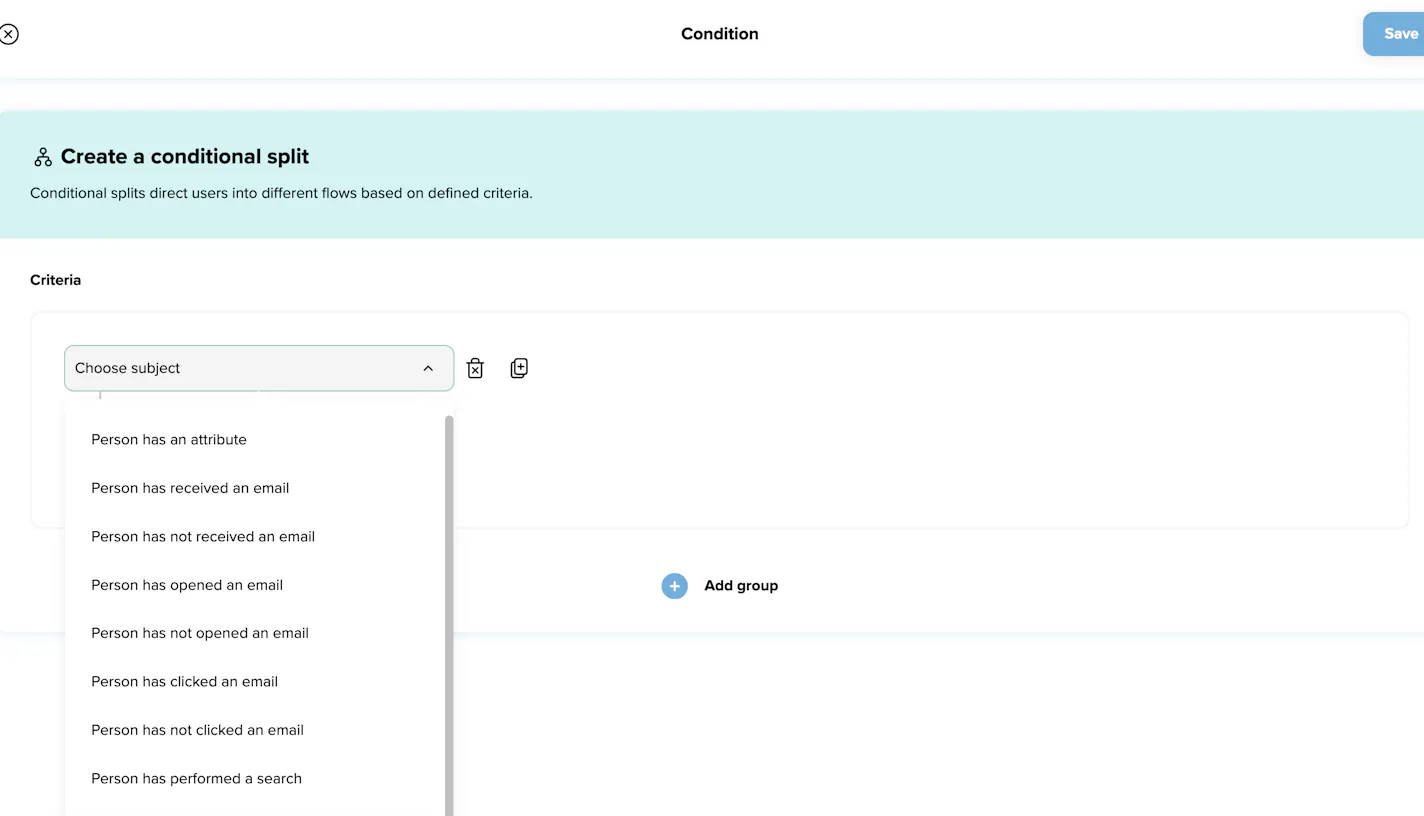
This creates two paths:
- Yes path: Users who meet the condition
- No path: Users who don’t
You can now tailor messaging for each group.
Step 4: Build Out Each Path
For each branch:
- Click the “+” icon under the Yes/No path
- Add:
- Emails
- SMS messages
- Delays
- Additional conditions
You can continue layering conditions to create highly personalised journeys.
Step 5: Add Delays Between Messages
Delays prevent overwhelming users and help optimise engagement.
- Click the “+” icon between steps
- Select Add Delay
- Choose the time interval (e.g. 1 day, 3 hours, 7 days)
Best practice is to space messages appropriately depending on campaign type.
Step 6: End the Flow
Each path should end cleanly:
- Ensure all branches lead to an endpoint
This prevents users from getting stuck in incomplete flows.
Step 7: Configure Campaign Settings
In the Settings panel on the left hand side of the builder.
Duration
- Set when the campaign starts and ends
- Option to run indefinitely or within a fixed timeframe
Conditions
- Add global rules that must be met for entry.
- This is especially useful for refining audience targeting.
Step 8: Review and Launch
Before going live:
- Check all paths are connected
- Ensure messages are correctly configured, you can edit the content of your email or SMS campaigns by selecting the campaign and editing, enabling or disabling the campaign in the flow, creating a duplication for additional use in the flow and a delete option, if required. Duplicated campaigns can also be dragged and dropped into a split within the flow if required.
- Please ensure you validate conditions and delays to ensure your flow sends correctly, this includes enabling the campaigns required within the flow, ensuring you are happy with content and the conditions you have used in order for your campaign flow to be as successful as possible.
Once ready, launch the campaign to start sending messages automatically.
Tips for Success
- Start simple, then add complexity with conditions.
- Review statistics such as open rate, click rate and delivery with the flow builder to understand how well your campaign is converting.
- Use segmentation to personalise content and deliver precise flows to the correct audience.
- Test different paths to optimise performance.
- Avoid sending too many messages too quickly.
By combining triggers, messages, and conditional logic, you can create tailored email and SMS journeys that respond dynamically to customer behaviour.
Test Email sends
Once you are happy with your email campaign, use the Send Test function to preview an email as it would send. When selecting the Send Test button a small modal will appear where you can select from registered users on your dashboard that you would like to send a test to.
You will also find Salesfire internal emails on the dropdown for internal testing via our Design Team and your Account Manager. These emails do not need to be included in any test emails you wish to send.
Bcc within email campaigns
When adding a bcc to an email campaign, recipients are counted as individual sends. This means that each recipient, whether they are in the “To,” or “BCC” fields, is considered a separate email send. This is important to keep in mind when calculating your email usage and ensuring you stay within your plan’s limits.
When you are ready to complete your sequence, select Save and choose between saving as a draft or launching your campaign.
Adding SMS to your campaign sequences
Within your Email Campaign Overview you will find the Campaign Flow section, located on the right side.
You will find a plus option located between each of the preloaded email sequences.
Use the plus option to add SMS into your campaign sequences. SMS can be created throughout any of the campaigns available in the Salesfire dashboard.
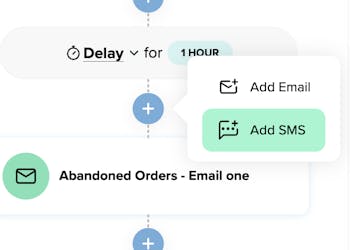
Once you have selected the Add SMS option you will be taken through to the SMS builder to customise your message.
To add a variable value and what this can achieve in an SMS or Email campaign.
Upon adding any links to your SMS text please ensure the Automatically shorten links checkbox is ticked in order to track clicks on your campaign in your Salesfire analytics section. Once you are happy with your SMS content select Save SMS to complete.

Why is my SMS using more credits when my character count hasn't increased?
Within the content section of your SMS campaign please be mindful of any special characters used. Special characters can increase the number of credits used from 1 credit to 2-3 credits per SMS.
Special characters such as emojis or content copied from external documents can increase SMS credit usage. For example, if an apostrophe is copied and pasted into the SMS content from another document, it may be treated as a special character. To avoid this, we recommend manually typing the apostrophe instead of pasting it, as the pasted version is more likely to be classified as a special character.
SMS testing
To send an SMS test, upon creating of your SMS campaign you will find the Send Test button. Test senders are users who have a phone number saved against their profile within the Salesfire dashboard. To become a test sender, dashboard users should click on their avatar and add their phone number to their profile.
You can send a maximum of 10 SMS tests per day. Each SMS test costs 5 credits.
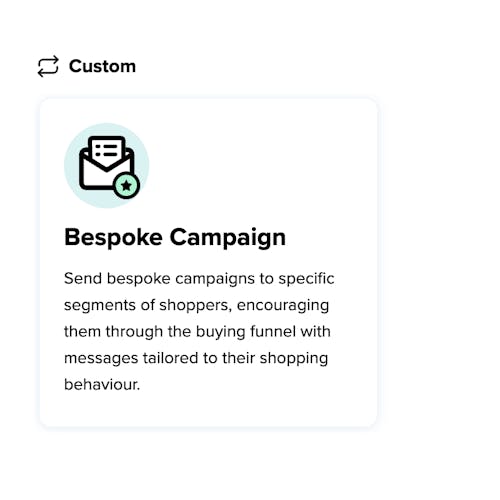
How to create a Bespoke Email Campaign
Bespoke Email Campaigns can be created with your Salesfire dashboard to send one time campaigns to a particular data segment that you have created.
How to create a Bespoke Email
If you have not already, create your desired segment within the Audiences section of the dashboard following the Help Centre guidance.
- To create a Bespoke Email Campaign go to the Email & SMS section of your dashboard menu.
- From the campaign menu, choose the Bespoke campaign template, select Launch to begin creating your bespoke email.
- You will find a preloaded template titled Email One which can be used to create your bespoke email campaign.
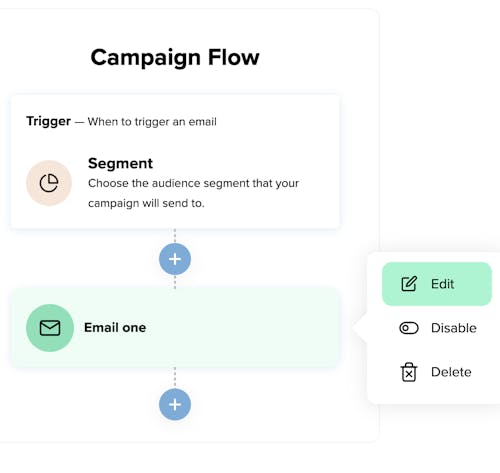
- Once you have created your email, hover over the Segment under Trigger within the Campaign Flow, this is where you will be able to select a segment or a list to deliver a specific campaign to a targeted audience.
- Select Update once you are happy with the audience segment that your campaign will send to.
If you would like more information on how to create a segment for you bespoke campaign trigger.
How to trigger a bespoke campaign to a imported list.
Scheduling a Bespoke campaign duration
Within the email builder you will find the Duration section, hover and select Edit to schedule your campaign to send between a specific date and time if you require advanced schedule. If your campaign is being prepared to send immediately you may leave this section blank.
Please note, the scheduling time will default to your device timezone upon editing and publishing. Please ensure your campaign is not scheduled for a past date as this will not schedule on the desired date and time.
Editing your campaign template
Editing your email template within Bespoke Email Campaigns to allow for specific email content to be delivered to your chosen audience.
To edit your email click Email one to edit the email with your desired content.
The main body of email content can be added within the templated Explain your email here text.
Don't forget to hit Save to update any campaigns or click on Send Test if you would like to send a test mail to preview the email as it would arrive into an inbox to make sure you are happy with the design and content before enabling the email send.
Click on Add Email if you require any additional emails to be added to your bespoke email campaign send or choose Add SMS if you wish to incorporate an SMS into your campaign flow alongside your email campaigns, or choose SMS alone for one off campaigns as required.